> ## Documentation Index
> Fetch the complete documentation index at: https://danswer-docs-versions-opensearch-example.mintlify.site/llms.txt
> Use this file to discover all available pages before exploring further.
# GCP
> Deploy Onyx on Google Cloud with GKE and Terraform, or on a Compute Engine VM
You can deploy Onyx on Google Cloud in two ways:
| Option | Use it for | What runs Onyx |
| - | - | - |
| [GKE with Terraform](#gke-with-terraform) | Production and larger teams | GKE, Cloud SQL, Memorystore, and Cloud Storage |
| [Compute Engine VM](#compute-engine-vm) | Pilots and small teams | Docker Compose on one VM |
Read the [Resourcing Guide](/deployment/getting_started/resourcing) before you start.
## GKE with Terraform
Onyx ships [Terraform modules for GCP](https://github.com/onyx-dot-app/onyx/tree/main/deployment/terraform/modules/gcp)
that create the Google Cloud infrastructure for Onyx. After Terraform finishes,
you install Onyx with the [Helm chart](/deployment/local/kubernetes).
The modules are a **reference implementation**. They show how we deploy Onyx and set sensible defaults.
Every environment is different. Fork the modules and change them for your project, network, and compliance rules.
### Managed services
| Onyx component | Helm chart default | GCP service | Terraform module |
| - | - | - | - |
| Kubernetes | Any cluster | GKE Standard, regional, with Workload Identity and private nodes | `gke` |
| Network | Any network | Custom-mode VPC, Cloud NAT, and Private Service Access | `vpc` |
| PostgreSQL | CloudNativePG in the cluster | Cloud SQL for PostgreSQL 16, private IP only, encrypted connections only | `postgres` |
| Redis | Redis in the cluster | Memorystore for Redis (not Cluster), with AUTH and TLS on port `6378` | `redis` |
| File store | The object store in the cluster | Cloud Storage bucket, accessed through Workload Identity | `gcs` |
| Document index | OpenSearch in the cluster | OpenSearch in the cluster, on a dedicated node pool. GCP has no managed OpenSearch. | `gke` |
| Web application firewall | None | Cloud Armor security policy. It attaches through an opt-in L7 load balancer that the GKE Gateway API builds. | `cloud-armor`, `l7-ingress` |
| Secrets | Kubernetes Secrets | Kubernetes Secrets. As an option, sync them from Secret Manager with the chart's `externalSecret` values. The modules do not create secrets in Secret Manager. | None |
The `onyx` module connects all of these modules. You can also use each module on its own.
### Prerequisites
* [Terraform](https://developer.hashicorp.com/terraform/install) `>= 1.12.0`
* [Google Cloud CLI](https://cloud.google.com/sdk/docs/install) (`gcloud`)
* [`kubectl`](https://kubernetes.io/docs/tasks/tools/) and [`helm`](https://helm.sh/docs/intro/install/)
* [`jq`](https://jqlang.org/download/), to read a Terraform output in a later step
Terraform uses Application Default Credentials. The account must be able to create networks, GKE clusters,
Cloud SQL, Memorystore, Cloud Storage buckets, IAM bindings, and Cloud Armor policies.
For the [L7 load balancer](#serve-through-an-l7-load-balancer-cloud-armor),
it must also be able to create global addresses and Certificate Manager resources.
```bash theme={null}
gcloud auth login
gcloud auth application-default login
```
The `onyx` module enables the other project APIs it needs. It cannot enable these two,
because Terraform reads the project before the first apply. Enable them before the first `terraform plan`:
```bash theme={null}
gcloud services enable cloudresourcemanager.googleapis.com serviceusage.googleapis.com \
--project my-project
```
Terraform creates the `onyx` namespace and a Kubernetes service account through the GKE API server.
Run `terraform apply` from an address in `master_authorized_networks`. If you set `private_endpoint_enabled = true`,
run it from inside the VPC. From any other address, the apply stops at those two resources.
If your organization enforces the `compute.managed.requireOsLogin` policy, the first cluster creation fails.
The module sets no node metadata. Turn on OS Login for the project before the first `terraform apply`:
```bash theme={null}
gcloud compute project-info add-metadata --metadata enable-oslogin=TRUE \
--project my-project
```
### Quickstart
This root module creates a complete Onyx stack. It uses the module from the Onyx repository at a fixed tag.
```hcl main.tf theme={null}
locals {
project_id = "my-project"
region = "us-east1"
}
terraform {
required_version = ">= 1.12.0"
required_providers {
google = { source = "hashicorp/google", version = "~> 7.33" }
kubernetes = { source = "hashicorp/kubernetes", version = "~> 2.37" }
}
}
provider "google" {
project = local.project_id
region = local.region
}
variable "postgres_password" {
type = string
sensitive = true
}
module "onyx" {
source = "git::https://github.com/onyx-dot-app/onyx.git//deployment/terraform/modules/gcp/onyx?ref=tf-gcp/v1.1.0"
name = "onyx"
project_id = local.project_id
region = local.region
size = "medium"
postgres_password = var.postgres_password # pass with TF_VAR_postgres_password
# Required. Include the address of the machine that runs terraform apply.
master_authorized_networks = [
{ cidr_block = "203.0.113.0/24", display_name = "office" },
]
}
# An access token for the account that runs Terraform.
# It does not depend on the cluster, so Terraform can read it before the cluster exists.
data "google_client_config" "default" {}
provider "kubernetes" {
host = module.onyx.cluster_endpoint
cluster_ca_certificate = base64decode(module.onyx.cluster_ca_certificate)
token = data.google_client_config.default.access_token
}
output "cluster_name" { value = module.onyx.cluster_name }
output "location" { value = module.onyx.location }
output "gcs_bucket_name" { value = module.onyx.gcs_bucket_name }
output "gcs_project_id" { value = module.onyx.gcs_project_id }
output "postgres_host" { value = module.onyx.postgres_host }
output "postgres_db_name" { value = module.onyx.postgres_db_name }
output "redis_host" { value = module.onyx.redis_host }
output "redis_port" { value = module.onyx.redis_port }
output "redis_server_ca_certs" { value = module.onyx.redis_server_ca_certs }
output "postgres_server_ca_cert" { value = module.onyx.postgres_server_ca_cert }
output "cloud_armor_policy_name" { value = module.onyx.cloud_armor_policy_name }
output "postgres_username" {
value = module.onyx.postgres_username
sensitive = true
}
output "redis_auth_string" {
value = module.onyx.redis_auth_string
sensitive = true
}
```
Configure the `kubernetes` provider from the module outputs, as in the example.
Do not use a `data "google_container_cluster"` block, and do not add `depends_on` to the module.
On the first apply the cluster does not exist, so the data source fails at plan time.
Apply it:
```bash theme={null}
export TF_VAR_postgres_password='change-me'
terraform init
terraform plan
terraform apply
```
GKE, Cloud SQL, and Memorystore use most of the apply time.
#### Pin the module version
GCP module releases have tags of the form `tf-gcp/vX.Y.Z`.
These versions are independent of the AWS modules (`tf/vX.Y.Z`), the Azure modules (`tf-azure/vX.Y.Z`),
and Onyx releases. A commit SHA also works as the `ref`. For automated pipelines, use a SHA, because nobody can move it.
Always set a `ref`. Without it, Terraform uses the default branch,
and an unrelated change can change your infrastructure.
### T-shirt sizing
The `size` input sets all compute and data-plane values together. If you set an individual sizing input,
that value replaces the tier default.
| | `small` | `medium` (default) | `large` |
| - | - | - | - |
| Use it for | Pilots and small teams, up to about 200 users | A department or company, about 200 to 1,000 users | Organization-wide, more than 1,000 users |
| Main pool machine | `n2-standard-8` | `n2-standard-16` | `n2-standard-16` |
| Main pool nodes | 1-3 | 1-5 | 2-8 |
| Document index pool machine | `n2-highmem-4` | `n2-highmem-8` | `n2-highmem-16` |
| Document index pool disk | 256 GB | 512 GB | 1024 GB |
| Cloud SQL tier | `db-custom-2-8192` | `db-custom-2-8192` | `db-custom-4-16384` |
| Cloud SQL disk | 64 GB | 128 GB | 256 GB |
| Memorystore memory | 5 GB | 10 GB | 20 GB |
Node counts are for the full pool, not for each zone.
The document index pool uses memory-optimized machines at all sizes, because OpenSearch runs on it.
The tiers size the infrastructure only. The Helm chart defaults request more CPU than one `small` main node has,
so the cluster adds nodes. To set the pod resources for each tier,
see the chart's [`SIZING.md`](https://github.com/onyx-dot-app/onyx/blob/main/deployment/helm/charts/onyx/SIZING.md).
Copy only the `resources` values. Its OpenSearch `nodeSelector` is for EKS. On GKE,
use the one in the Helm values below.
### Common configuration
GCP project for all resources.
GCP region for all resources, for example `us-east1`. Do not use a zone.
Prefix for all resource names. The module adds the active Terraform workspace to it,
so one root module can manage `dev`, `staging`, and `prod`.
`small`, `medium`, or `large`. See [T-shirt sizing](#t-shirt-sizing).
Password for the Cloud SQL `postgres` user. It must have at least 8 characters.
Pass it with `TF_VAR_postgres_password` or from a secret store.
Database that the module creates for Onyx. Set `POSTGRES_DB` to this value in the Helm values.
`REGIONAL` adds a standby in a second zone. It costs approximately two times more.
CIDR ranges that can reach the GKE API server. You must set this input, `private_endpoint_enabled`,
or `allow_unrestricted_api_server_access`.
The module does not create an API server that is open to all addresses by accident.
Serve the GKE API server on its private address only.
Create a Memorystore for Redis instance. Set to `false` to use the Redis in the cluster.
Serve TLS on port `6378`. A change to this value replaces the instance.
Create a Cloud Armor policy with the OWASP Core Rule Set, rate limits, and Adaptive Protection.
The policy protects Onyx only through the L7 load balancer.
See [Serve through an L7 load balancer](#serve-through-an-l7-load-balancer-cloud-armor).
Create a global address and Google-managed certificates for an L7 load balancer that the GKE Gateway API builds.
The Cloud Armor policy attaches to this load balancer.
See [Serve through an L7 load balancer](#serve-through-an-l7-load-balancer-cloud-armor).
Hostnames that the L7 load balancer serves, for example `["onyx.example.com"]`.
Use lowercase hostnames with no wildcard. You must set at least one when `enable_l7_ingress = true`.
Set to `false` to use an existing network. Then also set `network_id`, `subnet_id`, `pods_range_name`,
and `services_range_name`. The network must already have Private Service Access and Cloud NAT.
Protects the cluster, database, cache, bucket, Cloud Armor policy, and the L7 address and DNS authorizations.
Set it to `false` and apply before you run `terraform destroy`.
For all inputs,
see
[`modules/gcp/onyx/variables.tf`](https://github.com/onyx-dot-app/onyx/blob/main/deployment/terraform/modules/gcp/onyx/variables.tf).
### Outputs
| Output | Use |
| - | - |
| `cluster_name`, `location` | Arguments for `gcloud container clusters get-credentials` |
| `workload_namespace`, `workload_service_account_name` | Helm release namespace and `serviceAccount.name`. The defaults are `onyx` and `onyx-workload-access`. |
| `gcs_bucket_name`, `gcs_project_id` | `GCS_FILE_STORE_BUCKET_NAME` and `GCS_PROJECT_ID` |
| `postgres_host`, `postgres_port`, `postgres_db_name` | `POSTGRES_HOST`, `POSTGRES_PORT`, and `POSTGRES_DB` |
| `postgres_username` | `POSTGRES_USER` (sensitive) |
| `postgres_server_ca_cert` | CA certificate for the chart's `postgresTls` |
| `redis_host`, `redis_port` | `REDIS_HOST` and `REDIS_PORT` |
| `redis_auth_string` | Redis password (sensitive) |
| `redis_server_ca_certs` | CA certificates for the chart's `redisTls` |
| `workload_identity_principal` | IAM member of the Onyx service account. Use it to grant access to other resources. |
| `cloud_armor_policy_name` | `securityPolicy` in the `GCPBackendPolicy` |
| `l7_ip_address` | Address of the L7 load balancer. Point the `A` record of each domain at it. |
| `l7_address_name` | `NamedAddress` in the Gateway's `spec.addresses` |
| `l7_certificate_map_name` | Gateway annotation `networking.gke.io/certmap` |
| `l7_dns_authorization_records` | `CNAME` record to add at your DNS provider for each domain |
| `l7_certificate_names` | Certificate name for each domain, to check its state with `gcloud` |
The `l7_*` outputs are `null` when `enable_l7_ingress = false`.
### Install Onyx with Helm
```bash theme={null}
gcloud container clusters get-credentials "$(terraform output -raw cluster_name)" \
--location "$(terraform output -raw location)" --project my-project
```
This step applies only to the default L4 path, where ingress-nginx terminates TLS.
The [L7 load balancer](#serve-through-an-l7-load-balancer-cloud-armor) uses Google-managed certificates instead,
and does not need cert-manager or Let's Encrypt.
If you set `letsencrypt.enabled: true` in the Helm values, the chart creates a cert-manager `ClusterIssuer`.
The cert-manager CRDs must exist before you install the chart. Install cert-manager one time for each cluster:
```bash theme={null}
helm repo add jetstack https://charts.jetstack.io
helm repo update
helm upgrade --install cert-manager jetstack/cert-manager \
--namespace cert-manager --create-namespace \
--set crds.enabled=true
```
Terraform already created the `onyx` namespace. Do not create it again. Create the Secrets in that namespace:
```bash theme={null}
kubectl -n onyx create secret generic onyx-postgresql \
--from-literal=username="$(terraform output -raw postgres_username)" \
--from-literal=password="$TF_VAR_postgres_password"
kubectl -n onyx create secret generic onyx-redis \
--from-literal=redis_password="$(terraform output -raw redis_auth_string)"
# OpenSearch needs uppercase, lowercase, a digit, and a special character.
kubectl -n onyx create secret generic onyx-opensearch \
--from-literal=opensearch_admin_username=admin \
--from-literal=opensearch_admin_password='Os1!'"$(openssl rand -hex 16)"
# Signs password reset tokens and OAuth/OIDC login state.
kubectl -n onyx create secret generic onyx-userauth \
--from-literal=user_auth_secret="$(openssl rand -hex 32)"
```
OpenSearch reads its admin password one time, when the cluster starts for the first time.
A later change to the Secret does not change the password.
Memorystore serves TLS. Onyx verifies the server certificate with the Memorystore CA.
The file holds all CA certificates in the output, so a CA rotation does not stop the connection.
```bash theme={null}
terraform output -json redis_server_ca_certs | jq -r '.[]' > redis-ca.crt
kubectl -n onyx create configmap onyx-redis-ca --from-file=ca.crt=redis-ca.crt
```
Cloud SQL accepts only encrypted connections. Onyx encrypts by default, so PostgreSQL needs no TLS setting.
To also verify the Cloud SQL server certificate, create this ConfigMap and set `postgresTls` in the next step:
```bash theme={null}
terraform output -raw postgres_server_ca_cert > postgres-ca.crt
kubectl -n onyx create configmap onyx-postgres-ca --from-file=ca.crt=postgres-ca.crt
```
Do not set `postgresTls` with Onyx v4.8.x or earlier. Those versions reject the Cloud SQL server certificate,
and the API server fails with `Missing Authority Key Identifier`. Use `sslMode: verify-ca`. `verify-full` fails,
because the Cloud SQL certificate does not name the private IP address.
Replace each `<...>` with the Terraform output of the same name.
```yaml values.yaml theme={null}
# Pin the Onyx version. The chart default is "latest".
global:
version: ""
# Run all Onyx pods as the service account that has the bucket grant.
serviceAccount:
create: false
name: onyx-workload-access
postgresql:
enabled: false
redis:
enabled: false
objectStore:
enabled: false
minio:
enabled: false
configMap:
# Cloud SQL
POSTGRES_HOST: ""
POSTGRES_PORT: "5432"
POSTGRES_DB: "onyx" # postgres_db_name. Without it, Onyx uses the "postgres" database.
# Memorystore
REDIS_HOST: ""
REDIS_PORT: "6378" # redis_port. 6378 is the TLS port.
# Cloud Storage
FILE_STORE_BACKEND: "gcs"
GCS_FILE_STORE_BUCKET_NAME: ""
GCS_PROJECT_ID: ""
# The address that users open. Links and login redirects use it.
WEB_DOMAIN: "https://onyx.example.com"
auth:
postgresql:
existingSecret: "onyx-postgresql" # Keys: username, password
redis:
existingSecret: "onyx-redis" # Key: redis_password
opensearch:
existingSecret: "onyx-opensearch" # Keys: opensearch_admin_username, opensearch_admin_password
userauth:
enabled: true
existingSecret: "onyx-userauth" # Key: user_auth_secret
# Cloud Storage uses Workload Identity, so Onyx needs no S3 keys.
objectstorage:
enabled: false
# Sets REDIS_SSL=true and verifies the Memorystore certificate.
redisTls:
enabled: true
caConfigMapName: onyx-redis-ca
caKey: ca.crt
# Optional. Verifies the Cloud SQL certificate. See the warning in the previous step.
# postgresTls:
# enabled: true
# sslMode: verify-ca
# caConfigMapName: onyx-postgres-ca
# caKey: ca.crt
# Run OpenSearch on the tainted document index pool.
opensearch:
nodeSelector:
onyx.app/workload: document-index
tolerations:
- key: document-index
operator: Equal
value: "true"
effect: NoSchedule
```
Do not set `GCS_SERVICE_ACCOUNT_KEY_PATH` or `GCS_SERVICE_ACCOUNT_KEY_JSON`.
Onyx then uses Application Default Credentials,
which get the Workload Identity of the `onyx-workload-access` service account.
The service account needs no annotation,
because IAM grants the bucket roles directly to the Kubernetes service account.
Install into the `onyx` namespace. The service account with the bucket grant exists only in that namespace.
```bash theme={null}
helm repo add onyx https://onyx-dot-app.github.io/onyx/
helm repo update
# Find a chart version
helm search repo onyx/onyx --versions | head
helm upgrade --install onyx onyx/onyx --namespace onyx \
--version -f values.yaml
```
Always set `--version`. Without it, each upgrade installs the newest chart.
### Verify the deployment
```bash theme={null}
kubectl -n onyx get pods -o wide
```
Wait until all pods are `Running`. Make sure that the OpenSearch pod runs on a node of the document index pool.
```bash theme={null}
kubectl -n onyx logs deploy/onyx-api-server -f
```
Look for these problems:
* `403` errors from Cloud Storage: the pods do not run as `onyx-workload-access`, or the release is not in
the `onyx` namespace.
* Redis connection errors: `redisTls` is not enabled, or `REDIS_PORT` is not `6378`.
* `Missing Authority Key Identifier`: `postgresTls` is set on an Onyx version that cannot verify Cloud SQL.
Remove `postgresTls`.
For a test, forward a local port:
```bash theme={null}
kubectl -n onyx port-forward service/onyx-nginx 8080:80
```
Then open [http://localhost:8080](http://localhost:8080). For this test,
set `WEB_DOMAIN` to `http://localhost:8080`, or login redirects go to the wrong address.
For public access, point a DNS record such as `onyx.example.com` to the external IP of the `onyx-nginx` Service.
This is the default L4 path.
The `onyx-nginx` Service has a public IP address and serves plain HTTP until you set up TLS. For production,
serve through the [L7 load balancer](#serve-through-an-l7-load-balancer-cloud-armor).
It adds HTTPS and Cloud Armor.
### Serve through an L7 load balancer (Cloud Armor)
By default, the chart exposes Onyx through ingress-nginx behind a Service of type `LoadBalancer`. On GKE,
that is an L4 pass-through load balancer. A Cloud Armor policy cannot attach to it.
If you do not attach the policy to an L7 load balancer, it protects nothing, and Google Cloud shows no error.
To put the policy in front of Onyx, serve through a global external Application Load Balancer.
The GKE Gateway API builds that load balancer. The `gke` module already turns on the Gateway API.
This path replaces the ingress-nginx `LoadBalancer` Service, cert-manager, and Let's Encrypt for the hosts it serves.
Terraform creates the GCP resources that the Gateway uses: a global address,
and a certificate map with one Google-managed certificate for each domain. You apply the Kubernetes objects yourself.
They are CRDs, and a `kubernetes_manifest` of a CRD fails the plan of a new cluster.
The load balancer sends traffic to the Onyx server block of the chart's nginx, on port `1024`.
The chart's `LoadBalancer` Service uses the same port. The API, web server, and MCP routes stay in nginx.
Add these inputs and outputs to the root module:
```hcl main.tf theme={null}
module "onyx" {
# ...
enable_l7_ingress = true
l7_domains = ["onyx.example.com"]
}
output "l7_ip_address" {
value = module.onyx.l7_ip_address
}
output "l7_address_name" {
value = module.onyx.l7_address_name
}
output "l7_certificate_map_name" {
value = module.onyx.l7_certificate_map_name
}
output "l7_dns_authorization_records" {
value = module.onyx.l7_dns_authorization_records
}
output "l7_certificate_names" {
value = module.onyx.l7_certificate_names
}
output "cloud_armor_policy_name" {
value = module.onyx.cloud_armor_policy_name
}
```
Use lowercase hostnames with no wildcard. Keep `enable_cloud_armor` on, which is the default.
Then run `terraform apply`. The `onyx` module turns on the Certificate Manager API.
If you set `enable_project_apis = false`, turn on that API yourself first.
```bash theme={null}
terraform output -json l7_dns_authorization_records
```
For each domain, add the record at your DNS provider. It is a `CNAME` named `_acme-challenge..`.
The record proves that you control the domain. It does not move traffic,
so the current load balancer continues to serve Onyx.
```bash theme={null}
terraform output -json l7_certificate_names
gcloud certificate-manager certificates describe \
--location=global --project my-project --format='value(managed.state)'
```
Wait for `ACTIVE` on each certificate. This usually takes minutes after the `CNAME` resolves,
but it can take hours when the DNS provider is slow. If a certificate stays `PROVISIONING`,
`managed.authorizationAttemptInfo` in the full output tells why.
Apply these objects in the release namespace. Replace each value in `<>` with the Terraform output of the same name.
The examples use the release name `onyx` and the namespace `onyx`.
```yaml l7-gateway.yaml theme={null}
# A dedicated Service for the Gateway. Only one GCPBackendPolicy can attach to
# a Service, and the chart's own nginx Service changes type in a later step.
apiVersion: v1
kind: Service
metadata:
name: onyx-nginx-l7
namespace: onyx
spec:
type: ClusterIP
selector:
app.kubernetes.io/name: nginx
app.kubernetes.io/instance: onyx # the Helm release name
app.kubernetes.io/component: controller
ports:
- name: http
port: 80
targetPort: 1024
protocol: TCP
---
apiVersion: gateway.networking.k8s.io/v1
kind: Gateway
metadata:
name: onyx
namespace: onyx
annotations:
networking.gke.io/certmap:
spec:
gatewayClassName: gke-l7-global-external-managed
addresses:
- type: NamedAddress
value:
listeners:
# No tls block: the certificate map annotation supplies the certificates.
- name: https
protocol: HTTPS
port: 443
- name: http
protocol: HTTP
port: 80
---
apiVersion: gateway.networking.k8s.io/v1
kind: HTTPRoute
metadata:
name: onyx-https
namespace: onyx
spec:
parentRefs:
- name: onyx
sectionName: https
hostnames:
- onyx.example.com # every l7_domains entry
rules:
- backendRefs:
- name: onyx-nginx-l7
port: 80
---
apiVersion: gateway.networking.k8s.io/v1
kind: HTTPRoute
metadata:
name: onyx-http-redirect
namespace: onyx
spec:
parentRefs:
- name: onyx
sectionName: http
hostnames:
- onyx.example.com
rules:
- filters:
- type: RequestRedirect
requestRedirect:
scheme: https
statusCode: 301
---
# The load balancer probes the pod on 1024 directly. The default probe path
# is "/", which proxies to the web server; /nginx-health answers in nginx.
apiVersion: networking.gke.io/v1
kind: HealthCheckPolicy
metadata:
name: onyx-nginx-l7
namespace: onyx
spec:
default:
config:
type: HTTP
httpHealthCheck:
portSpecification: USE_FIXED_PORT
port: 1024
requestPath: /nginx-health
targetRef:
group: ""
kind: Service
name: onyx-nginx-l7
---
apiVersion: networking.gke.io/v1
kind: GCPBackendPolicy
metadata:
name: onyx-nginx-l7
namespace: onyx
spec:
default:
securityPolicy:
# The load balancer counts the whole response, not the idle time as nginx
# does. Chat and deep research stream for many minutes.
timeoutSec: 3600
# Cloud Armor writes its decisions to these logs. A GCPBackendPolicy with
# no logging section turns them off.
logging:
enabled: true
sampleRate: 1000000
targetRef:
group: ""
kind: Service
name: onyx-nginx-l7
```
```bash theme={null}
kubectl apply -f l7-gateway.yaml
```
The Gateway takes a few minutes to program. When it is ready,
`kubectl -n onyx describe gateway onyx` shows `Programmed: True`. Each policy shows `Attached: True` in its status.
Send a request to the new address without a DNS change:
```bash theme={null}
curl --resolve onyx.example.com:443: https://onyx.example.com/nginx-health
```
Onyx marks its cookies `Secure` and builds its login redirects from `WEB_DOMAIN`.
Set it to the HTTPS address in the Helm values:
```yaml values.yaml theme={null}
configMap:
WEB_DOMAIN: "https://onyx.example.com"
```
Point the `A` record of each domain at `l7_ip_address`.
After the old DNS record expires from caches, nothing uses the ingress-nginx `LoadBalancer`.
Make it a cluster-internal Service. This removes the L4 load balancer and its public address.
Certificate Manager now serves the certificate for these hosts,
so turn off the chart's `ingress` and `letsencrypt` too. You no longer need cert-manager for these hosts.
```yaml values.yaml theme={null}
nginx:
controller:
service:
type: ClusterIP
ingress:
enabled: false
letsencrypt:
enabled: false
```
Then run `helm upgrade` with the new values.
Set `cloud_armor_preview = true` to log rule matches without blocking requests while you tune the rules.
Notes:
* Cloud Armor sees the real client address. The rate limits count each client separately,
and the IP and country rules match the client.
* When you add or remove a domain, Terraform adds or removes only the certificate of that domain.
The other domains continue to serve.
* `deletion_protection` guards the address and the DNS authorizations.
Set it to `false` and apply before you remove a domain.
* If one response can stream for longer than one hour, make `timeoutSec` larger.
### Run the model servers on GPUs (optional)
`enable_gpu_node_pool = true` adds a GPU node pool. It does not move a model server to the pool.
The pool has the taint `nvidia.com/gpu=present:NoSchedule` and the label `onyx.app/gpu=true`. To use it,
set `nodeSelector`, `tolerations`,
and an `nvidia.com/gpu` limit on `inferenceCapability` or `indexCapability` in the Helm values.
The default GPU pool has one node with one GPU, so give the GPU to one model server only.
### Notes
* **State storage.** For shared or production use, store Terraform state in a
[`gcs` backend](https://developer.hashicorp.com/terraform/language/backend/gcs).
* **Workspaces.** Resource names include the active Terraform workspace. A `name = "onyx"` module in workspace
`prod` creates `onyx-prod` resources.
* **Existing network.** With `create_network = false`, the network must already have a Private Service Access
connection. If not, Cloud SQL and Memorystore fail to create.
* **Database name.** If you do not set `POSTGRES_DB`, Onyx uses the `postgres` database that Cloud SQL creates,
and the `onyx` database stays empty.
* **Database connections.** `postgres_max_connections` defaults to `500`. Make it larger if you add many API or
worker replicas. A change restarts the instance.
* **Destroy.** Set `deletion_protection = false` and apply before you run `terraform destroy`.
## Compute Engine VM
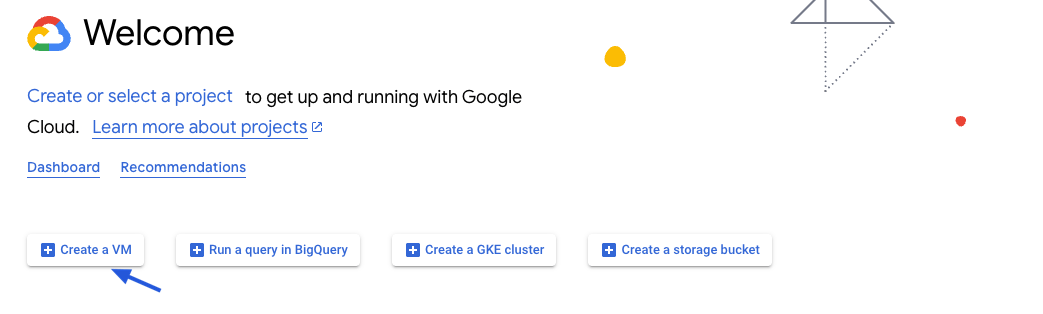
**Make sure that your Google Cloud account can create a VM instance.**
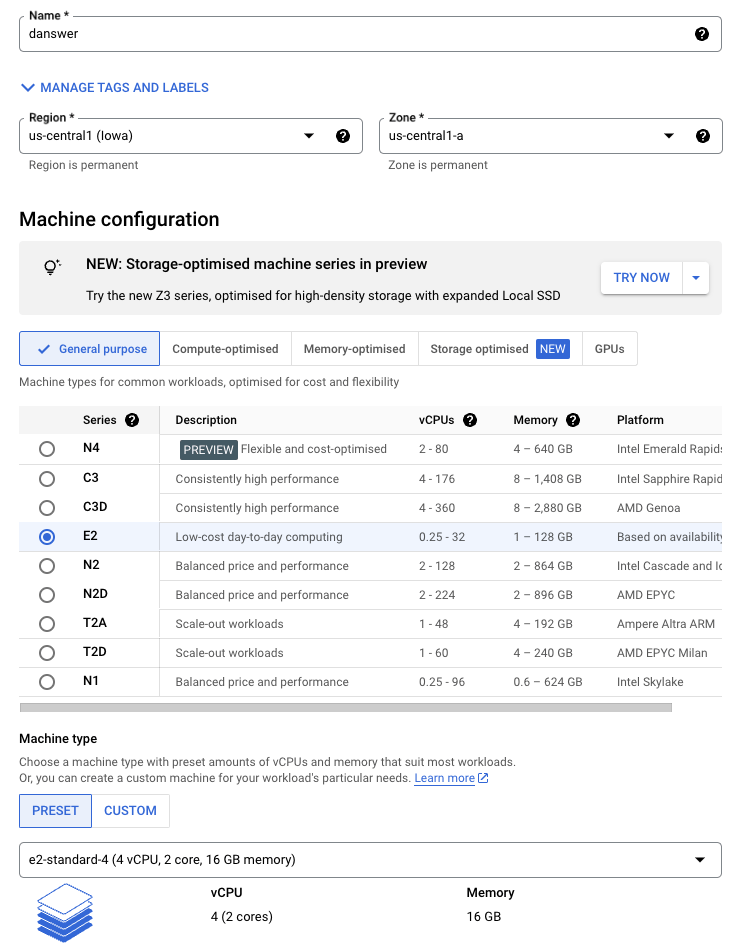
Create a VM instance with the appropriate resources. For this guide,
we will use the recommended `e2-standard-4` instance.
Read our [Resourcing guide](/deployment/getting_started/resourcing) for more details.
* Give your instance a descriptive name like `onyx-prod`
* Select the `Debian GNU/Linux 12` boot disk
* Select the `e2-standard-4` machine type
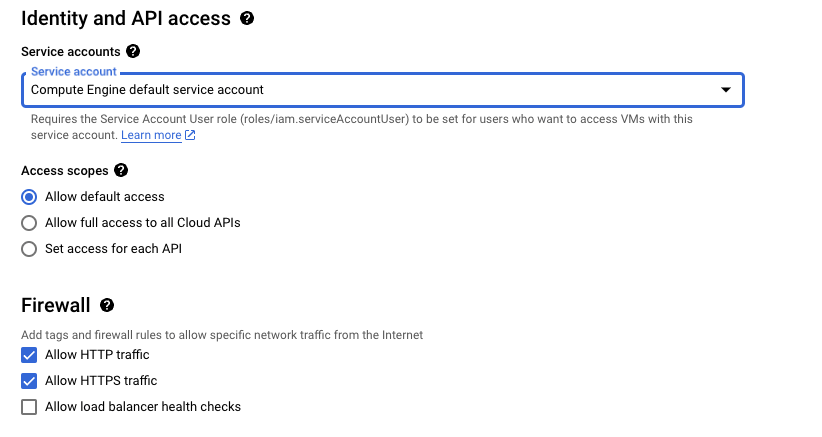
* Select `Allow HTTPS traffic` in the **Firewall** section
* Configure storage following the Resourcing Guide
 Click **Create** and then view your instance details.
Save the **External IP** of the instance!
If you don't have a domain, buy one from a DNS provider like [GoDaddy](https://www.godaddy.com/)
or just skip HTTPS for now.
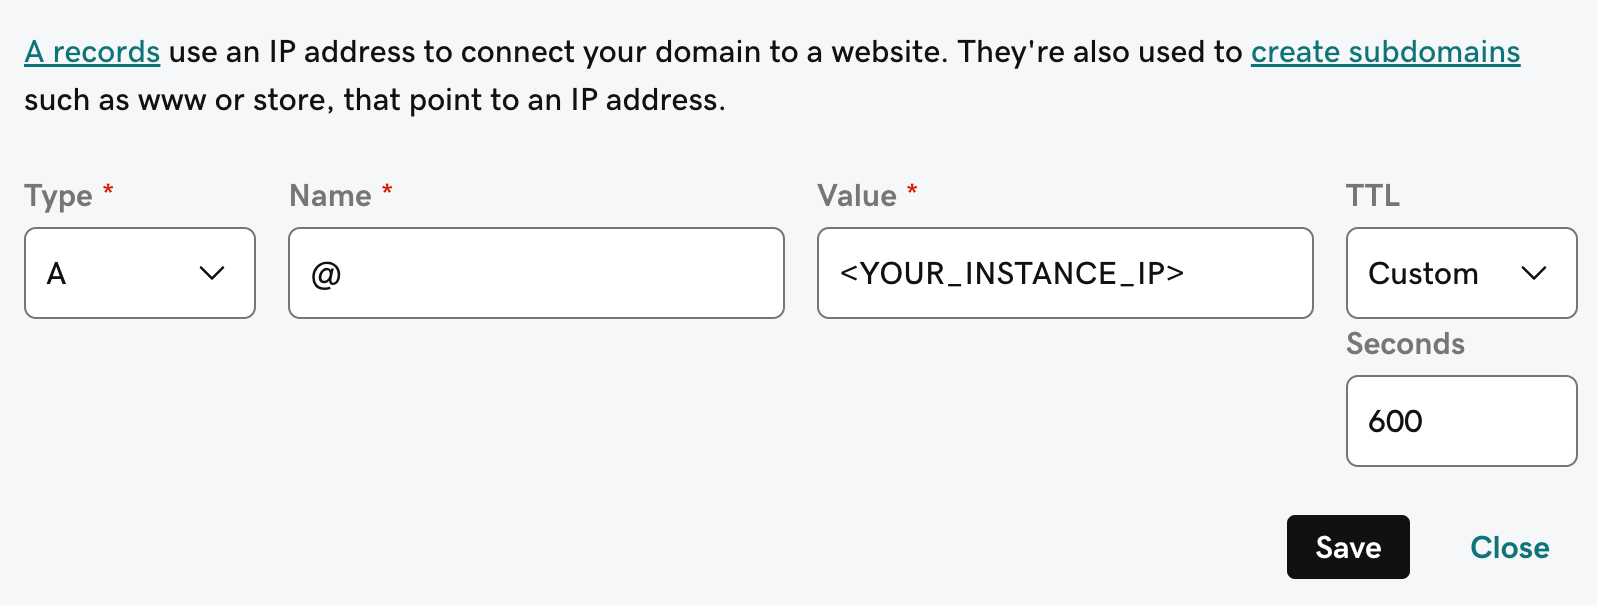
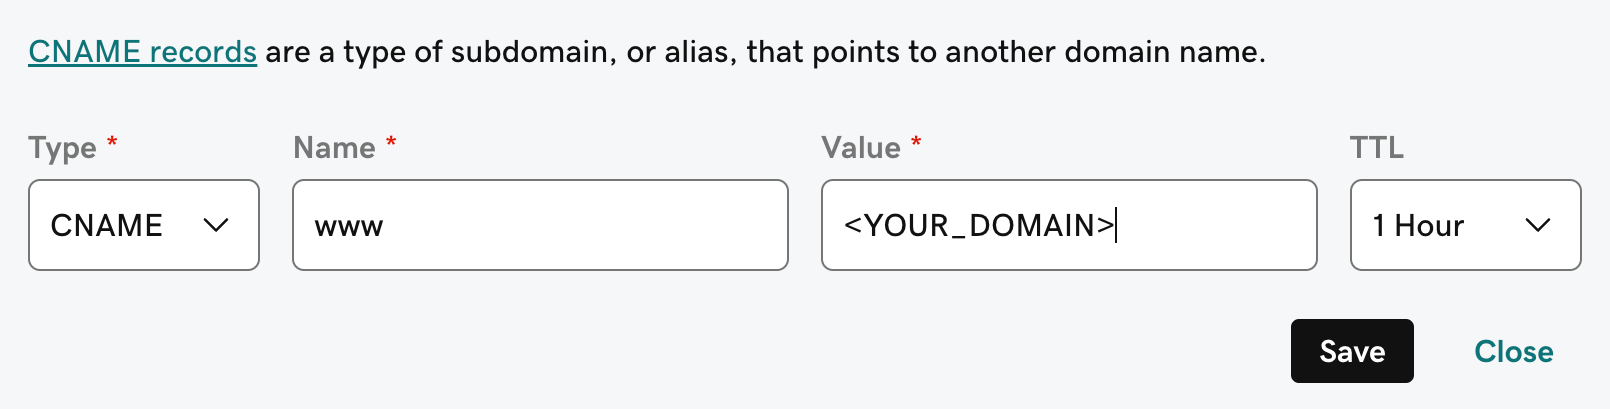
To point our domain to the new instance, we need to add an `A` and `CNAME` record to our DNS provider.
The `A` record should be the subdomain that you would like to use for the Onyx instance like `prod`.
The `CNAME` record should be the same name with the `www.` in front resulting in `www.prod` pointing to the full
domain like `prod.onyx.app`.
Click **Create** and then view your instance details.
Save the **External IP** of the instance!
If you don't have a domain, buy one from a DNS provider like [GoDaddy](https://www.godaddy.com/)
or just skip HTTPS for now.
To point our domain to the new instance, we need to add an `A` and `CNAME` record to our DNS provider.
The `A` record should be the subdomain that you would like to use for the Onyx instance like `prod`.
The `CNAME` record should be the same name with the `www.` in front resulting in `www.prod` pointing to the full
domain like `prod.onyx.app`.
 Onyx requires `git`, `docker`, and `docker compose`.
To install these on Debian GNU/Linux 12, run the following:
```bash theme={null}
sudo apt update
sudo apt install -y ca-certificates curl gnupg git
sudo install -m 0755 -d /etc/apt/keyrings
curl -fsSL https://download.docker.com/linux/debian/gpg | sudo gpg --dearmor -o /etc/apt/keyrings/docker.gpg
sudo chmod a+r /etc/apt/keyrings/docker.gpg
echo "deb [arch=$(dpkg --print-architecture) signed-by=/etc/apt/keyrings/docker.gpg] https://download.docker.com/linux/debian $(lsb_release -cs) stable" | sudo tee /etc/apt/sources.list.d/docker.list > /dev/null
sudo apt update
sudo apt install -y docker-ce docker-ce-cli containerd.io docker-buildx-plugin docker-compose-plugin
```
If you use Rocky Linux, RHEL, or a similar image, run the following:
```bash theme={null}
sudo dnf install -y dnf-plugins-core git
sudo dnf config-manager --add-repo https://download.docker.com/linux/rhel/docker-ce.repo
sudo dnf install -y docker-ce docker-ce-cli containerd.io docker-buildx-plugin docker-compose-plugin
sudo systemctl enable --now docker
```
To run `docker` without `sudo`, add your user to the `docker` group. Then log out and log in again:
```bash theme={null}
sudo usermod -aG docker $USER
```
To install Onyx, we'll need to clone the repo and set the necessary environment variables.
```bash theme={null}
git clone --depth 1 https://github.com/onyx-dot-app/onyx.git
cd onyx/deployment/docker_compose
cp env.prod.template .env
cp env.nginx.template .env.nginx
```
Fill out the `.env` and `.env.nginx` files.
```bash .env expandable theme={null}
WEB_DOMAIN= # Something like "onyx.app"
# If your email is something like "chris@onyx.app", then this should be "onyx.app"
# This prevents people outside your company from creating an account
VALID_EMAIL_DOMAINS=
```
Email/password login works out of the box, and SSO (Google / OIDC / SAML) is configured later from the admin panel.
See our [auth guides](/deployment/authentication/basic) for details.
```bash .env.nginx theme={null}
DOMAIN= # Something like "onyx.app"
```
Running the `init-letsencrypt.sh` script will get us a SSL certificate from letsencrypt and launch the Onyx stack.
```bash theme={null}
./init-letsencrypt.sh
```
You will hit an error if you fail the letsencrypt workflow more than 5 times.
You will need to wait 72 hours or request a new domain.
If you are skipping the HTTPS setup, start Onyx manually:
```bash theme={null}
docker compose -f docker-compose.dev.yml -p onyx-stack up -d --build --force-recreate
```
Give Onyx a few minutes to start up.
You can monitor the progress with `docker logs onyx-stack-api_server-1 -f`.
You can access Onyx from the instance Public IPv4 or from the domain you set up earlier!
## Next Steps
Set up authentication for your Onyx deployment with OAuth, OIDC, or SAML.
Learn about all available configuration options for your Onyx deployment.
This documentation is built and hosted on [Mintlify](https://mintlify.com), a developer documentation platform.
Onyx requires `git`, `docker`, and `docker compose`.
To install these on Debian GNU/Linux 12, run the following:
```bash theme={null}
sudo apt update
sudo apt install -y ca-certificates curl gnupg git
sudo install -m 0755 -d /etc/apt/keyrings
curl -fsSL https://download.docker.com/linux/debian/gpg | sudo gpg --dearmor -o /etc/apt/keyrings/docker.gpg
sudo chmod a+r /etc/apt/keyrings/docker.gpg
echo "deb [arch=$(dpkg --print-architecture) signed-by=/etc/apt/keyrings/docker.gpg] https://download.docker.com/linux/debian $(lsb_release -cs) stable" | sudo tee /etc/apt/sources.list.d/docker.list > /dev/null
sudo apt update
sudo apt install -y docker-ce docker-ce-cli containerd.io docker-buildx-plugin docker-compose-plugin
```
If you use Rocky Linux, RHEL, or a similar image, run the following:
```bash theme={null}
sudo dnf install -y dnf-plugins-core git
sudo dnf config-manager --add-repo https://download.docker.com/linux/rhel/docker-ce.repo
sudo dnf install -y docker-ce docker-ce-cli containerd.io docker-buildx-plugin docker-compose-plugin
sudo systemctl enable --now docker
```
To run `docker` without `sudo`, add your user to the `docker` group. Then log out and log in again:
```bash theme={null}
sudo usermod -aG docker $USER
```
To install Onyx, we'll need to clone the repo and set the necessary environment variables.
```bash theme={null}
git clone --depth 1 https://github.com/onyx-dot-app/onyx.git
cd onyx/deployment/docker_compose
cp env.prod.template .env
cp env.nginx.template .env.nginx
```
Fill out the `.env` and `.env.nginx` files.
```bash .env expandable theme={null}
WEB_DOMAIN= # Something like "onyx.app"
# If your email is something like "chris@onyx.app", then this should be "onyx.app"
# This prevents people outside your company from creating an account
VALID_EMAIL_DOMAINS=
```
Email/password login works out of the box, and SSO (Google / OIDC / SAML) is configured later from the admin panel.
See our [auth guides](/deployment/authentication/basic) for details.
```bash .env.nginx theme={null}
DOMAIN= # Something like "onyx.app"
```
Running the `init-letsencrypt.sh` script will get us a SSL certificate from letsencrypt and launch the Onyx stack.
```bash theme={null}
./init-letsencrypt.sh
```
You will hit an error if you fail the letsencrypt workflow more than 5 times.
You will need to wait 72 hours or request a new domain.
If you are skipping the HTTPS setup, start Onyx manually:
```bash theme={null}
docker compose -f docker-compose.dev.yml -p onyx-stack up -d --build --force-recreate
```
Give Onyx a few minutes to start up.
You can monitor the progress with `docker logs onyx-stack-api_server-1 -f`.
You can access Onyx from the instance Public IPv4 or from the domain you set up earlier!
## Next Steps
Set up authentication for your Onyx deployment with OAuth, OIDC, or SAML.
Learn about all available configuration options for your Onyx deployment.
This documentation is built and hosted on [Mintlify](https://mintlify.com), a developer documentation platform.